Делаем аналоговый шлюз в ADN Systems DMR Server
ANALOG <---> DMR GATEWAY

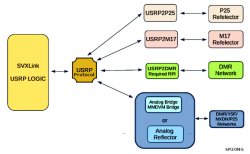
В данной статье описан мост для получения и трансляции (транс кодирования) звука из SVX рефлектора в DMR и обратно. Так же можно подключить радиостанции, образовывая узел или репитер. Подключится к Echolink или FRN сети.
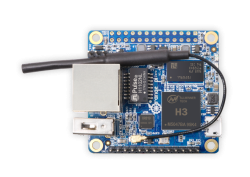
Делаем шлюз с помощью SVXLink-USRP и DVSwitch на ARM платформе как Raspberry Pi и подобных, или VPS, без дорогостоящего AMBE кодека (DV свистка), используя эмулятор md380-emu
Собственно мост можно настроить не только в DMR и обратно, так же можно транс кодировать и/из в другие моды (YSF, D-STAR, NXDN, P25...).
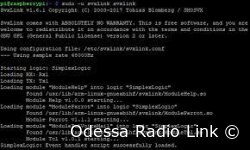
Ставим SVXLink-USRP:
sudo apt-get update && sudo apt-get upgrade -ycd
sudo useradd -rG audio,plugdev,dialout svxlinksudo apt install -y mc zip unzip libcurl4-openssl-dev libjsoncpp-dev g++ cmake make libsigc++-2.0-dev libgsm1-dev libpopt-dev alsa-utils tcl-dev libgcrypt20-dev vorbis-tools curl libcurl4-openssl-dev git rtl-sdr libspeex-dev libasound2-dev libopus-dev librtlsdr-devsudo git clone https://github.com/dl1hrc/svxlink.gitcd svxlink/src
sudo git checkout svxlink-usrp
sudo mkdir build
cd build
sudo cmake -DUSE_QT=OFF -DCMAKE_INSTALL_PREFIX=/usr -DSYSCONF_INSTALL_DIR=/etc -DLOCAL_STATE_DIR=/var -DCMAKE_BUILD_TYPE=Release -DWITH_CONTRIB_USRP_LOGIC=ON -DWITH_SYSTEMD=ON -DCPACK_GENERATOR=DEB ..
sudo makesudo make packageПосле команды "make package" сгенерируется пакет нашего SVX. Скопируйте его полное название и замените в следующей команде, что ниже, если оно у вас отличается. (У меня deb пакет сгенерировался с такой версией: svxlink-13.12.1.1642.g00cc3916-Linux.deb)
Далее выполним команду:
sudo dpkg -i svxlink-13.12.1.1642.g00cc3916-Linux.debВключаем автозагрузку
sudo systemctl enable --now svxlinkТеперь надо установить DVSWITCH по этой инструкции
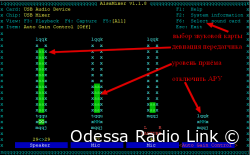
Далее приступаем к редактированию конфигов по моим образцам. Или можете просто их скачать от сюда, распаковать и скопировать с заменой предварительно подправив их под себя. (см. комментарии в файлах).
nano /etc/svxlink/svxlink.conf
###############################################################################
#                                                                             #
#                Configuration file for the SvxLink server                    #
#                                                                             #
###############################################################################

[GLOBAL]
LOGIC_CORE_PATH=/usr/lib/arm-linux-gnueabihf/svxlink
LOGICS=ReflectorLogic,UsrpLogic
TIMESTAMP_FORMAT="%c"
CARD_SAMPLE_RATE=48000
LINKS=UsrpLink

[ReflectorLogic]
TYPE=Reflector
HOSTS=Адрес вашего SVX рефлектора:5300
HOST_PORT=5300
HOST_PRIO=100
HOST_PRIO_INC=1
HOST_WEIGHT=10
CALLSIGN="Analog<>DMR-Gateway"
AUTH_KEY="Пароль к вашеq группе на SVX Рефлекторе"
JITTER_BUFFER_DELAY=2
DEFAULT_TG=ваша SVX разговорная группа (У нас она 25578)
MONITOR_TGS=ваша SVX разговорная группа (У нас она 25578)
TG_SELECT_TIMEOUT=86400
ANNOUNCE_REMOTE_MIN_INTERVAL=3600
ANNOUNCE_CONNECTION_STATUS=60
EVENT_HANDLER=/usr/share/svxlink/events.tcl
NODE_INFO_FILE=/etc/svxlink/node_info.json
MUTE_FIRST_TX_LOC=0
MUTE_FIRST_TX_REM=0
QSY_PENDING_TIMEOUT=15
RECONNECT_SECONDS=5
AUDIO_CODEC=OPUS
OPUS_ENC_COMPLEXITY=10
OPUS_ENC_BITRATE=200000
OPUS_ENC_VBR=0
LIMITER_THRESH=0
UDP_HEARTBEAT_INTERVAL=45

[UsrpLogic]
TYPE=Usrp
RX=Rx2
TX=Tx2
USRP_HOST=127.0.0.1
USRP_TX_PORT=44442
USRP_RX_PORT=44441
CALL=UT3FT
DMRID=Ваш DMR id (2550xxx)
RPTID=
DEFAULT_CC=1
DEFAULT_TG=Ваша разговорная группа на DMR сервере (У нас она 25578)
DEFAULT_TS=2
#PREAMP=3
#FILTER_FROM_USRP=HsBq2/0.01/-18/4000
FILTER_FROM_USRP=HsBq1/0.05/-5/4000
FILTER_TO_USRP=BpBu1/250-3800
#NET_PREAMP=3
JITTER_BUFFER_DELAY=100
EVENT_HANDLER=/usr/share/svxlink/events.tcl

[UsrpLink]
NAME=Usrp
CONNECT_LOGICS=UsrpLogic,ReflectorLogic
DEFAULT_ACTIVE=1
OPTIONS=DEFAULT_CONNECT,NO_DISCONNECT
TIMEOUT=0

[Rx2]
TYPE=Local
PTY_PATH=/tmp/SQL
SQL_DET=PTY
SQL_TAIL_ELIM=50

[Tx2]
TYPE=Local
PTT_PTY=/tmp/PTT
PTT_TYPE=PTY
PTT_PORT=PTY
TX_DELAY=250

[LocationInfo]
APRS_SERVER_LIST=euro.aprs2.net:14580
#STATUS_SERVER_LIST=aprs.echolink.org:5199
#LON_POSITION=12.10.00E
#LAT_POSITION=51.10.00N
#CALLSIGN=EL-DL0ABC
#FREQUENCY=438.875
#TX_POWER=8
#ANTENNA_GAIN=6
#ANTENNA_HEIGHT=20m
#ANTENNA_DIR=-1
PATH=WIDE1-1
BEACON_INTERVAL=10
#TONE=136
COMMENT=SvxLink by SM0SVX (www.svxlink.org)
nano /etc/svxlink/node_info.json
{
  "nodeLocation": "Шлюз",
  "hidden": false,
  "sysop": "CALL1 CALL2",
  "toneToTalkgroup": {"136.5": 0, "88.5": 999, "123.0": 9990},
  "qth": [
    {
      "name": "My QTH Name",
      "pos": {
        "lat": 60.12345,
        "long": 17.12345,
        "loc": "AA88BB"
      },
      "rx": {
        "A": {
          "name": "Rx1",
          "freq": 433.450,
          "sqlType": "CTCSS",
          "ctcssFreq": [136.5,88.5,123.0],
          "ant": [
            {
              "comment": "Yagi south",
              "height": 50,
              "dir": 180
            },
            {
              "comment": "Yagi north",
              "height": 50,
              "dir": 0
            }
          ]
        },
        "B": {
          "name": "Rx2",
          "freq": 145.500,
          "sqlType": "COS",
          "ant": [
            {
              "comment": "Diamond X310 Omni",
              "height": 10
            }
          ]
        }
      },
      "tx": {
        "A": {
          "name": "Tx1",
          "freq": 433.450,
          "pwr": 20,
          "ctcssFreq": 136.5,
          "ant": [
            {
              "comment": "Yagi south",
              "height": 50,
              "dir": 180
            },
            {
              "comment": "Yagi north",
              "height": 50,
              "dir": 0
            }
          ]
        }
      }
    }
  ]
}
nano /opt/Analog_Bridge/Analog_Bridge.ini
; Analog_Bridge configuration file.
;   This file should be placed in either /etc or it can be
;   supplied as a path on the Analog_Bridge command line.

; The best way to think of this file is that there are two main sections, the USRP (analog audio) and
; AMBE_AUDIO (compressed audio).  Analog_Bridge will take everything sent to the USRP port and
; encode it for transmission on the AMBE_AUDIO port.  The encoder will use the format defined in ambeMode.
; As you might expect, the reverse direction is defined too.

; Analog_Bridge supports include files. More on this later...
include = dvsm.macro
; include = asl.macro

; General Section describes settings for Analog_Bridge itself.
[GENERAL]
logLevel = 2
exportMetadata = true
transferRootDir = /tmp
subscriberFile = /var/lib/dvswitch/subscriber_ids.csv
decoderFallBack = true
useEmulator = true
emulatorAddress = 127.0.0.1:2470
pcmPort = 2222

; Information for xx_Bridge (Where xx is MMDVM, Quantar, HB, IPSC)
[AMBE_AUDIO]
address = 127.0.0.1                     ; IP address of xx_Bridge
txPort = 31103                          ; Transmit TLV frames to partner on this port
rxPort = 31100                          ; Listen for TLV frames from partner on this port
ambeMode = DMR                          ; DMR, DMR_IPSC, DSTAR, NXDN, P25, YSFN, YSFW (encode PCM to this format)
minTxTimeMS = 2500                      ; Analog -> Digital Minimum time in MS for hang delay (0-10000)

; The metadata below is used when ASL is the source since it does not have any concept of digital modes
gatewayDmrId = Ваш DMR ID (2550xxx)                        ; ID to use when transmitting from Analog_Bridge 7 digit ID
repeaterID = Ваш DMR ID плюс две цифры номера(2550xxxxx)   ; ID of source repeater 7 digit ID plus 2 digit SSID
txTg = Ваша разговорная группа на DMR сервере              ; TG to use for all frames sent from Analog_Bridge -> xx_Bridge
txTs = 2                                ; Slot to use for frames sent from Analog_Bridge -> xx_Bridge
colorCode = 1                           ; Color Code to assign DMR frames

; Information for USRP channel driver.  This interface uses PCM to transfer audio information
; There are two typical configurations, ASL and Transcode.  ASL (AllstarLink) is for analog clients connected
; to a digital network.  Transcode is when Analog_Bridge actually points its PCM interfaces back at itself,
; causing a TLV <-- (pcm <--> pcm) --> TLV type of architecture.
;   When using ASL, this matches the rpt.conf ASL file with a setting like:
;   rxchannel = usrp/127.0.0.1:34001:32001
;   When Transcoding, make two ini files and set txPort equal to the other instance rxPort (crossover).  Launch
;   each instance with its own ini file.
[USRP]
address = 127.0.0.1                     ; IP address of USRP partner (Analog_Reflector, Allstar/Asterisk or another Analog_Bridge)
txPort = 44441                          ; Transmit USRP frames on this port
rxPort = 44442                          ; Listen for USRP frames on this port
; usrpAudio = AUDIO_UNITY                 ; Digital -> Analog (AUDIO_UNITY, AUDIO_USE_GAIN, AUDIO_USE_AGC)
; usrpGain = 1.10                         ; Gain factor when usrpAudio = AUDIO_USE_GAIN (0.0 to 5.0) (1.0 = AUDIO_UNITY)
; usrpAGC = -20,10,100                    ; Set the agc threshold (db), slope (db) and decay (ms)
; tlvAudio = AUDIO_UNITY                  ; Analog -> Digital (AUDIO_UNITY, AUDIO_USE_GAIN, AUDIO_BPF)
; tlvGain = 0.35                          ; Gain factor when tlvAudio = AUDIO_USE_GAIN (0.0 to 5.0) (1.0 = AUDIO_UNITY)
;
; from DMR to SVX
usrpAudio = AUDIO_USE_AGC
; try use -16 or -26
usrpAGC=-20,10,500
usrpGain = 4.0
;
; from SVX to DMR
tlvAudio = AUDIO_USE_GAIN
; try to use 0.6
tlvGain = 0.6

[MACROS]

; Where the macros are
; xxxx=yyyy
; xxxx is the dial string to match
; yyyy is the command line to execute

; xxxx must be preceded by a *
; xxxx can be any string (alphanumeric)
; yyyy is the command to execute
; yyyy will replace xxxx in the dial string
; arguments follow the macro name with a # delimiter

; For example using macro "5678" above would look like:
; *5678#9876

; Which would invoke:
; echo 9876

; Information for DV3000 hardware decoder
;   There are two configuration modes: IP (AMBEServer) and serial (direct connect hardware)
;   Use top server and port if using AMBEServer
;   Use bottom server/port and serial = true if using the DV3000u (thumbdv)
;   Did you run AMBETest4.py before using this?
[DV3000]
; address = 127.0.0.1                 ; IP address of AMBEServer
; rxPort = 2460                       ; Port of AMBEServer
; address = /dev/ttyUSB0              ; Device of DV3000U on this machine
; baud = 460800                       ; Baud rate of the dongle (230400 or 460800)
; serial = true                       ; Use serial=true for direct connect or serial=false for AMBEServer
nano /opt/MMDVM_Bridge/DVSwitch.ini
; MMDVM_Bridge export / import configuration file.
;   This file should be placed along side of MMDVM_Bridge or you can supply
;   an absolute path in the DVSWITCH environment variable, e.g:
;   DVSWITCH=/etc/MMDVM_Bridge/DVSwitch.ini
;   before executing MMDVM_Bridge
;
; Another method to set the enviorment variable is to use the systemd unit file
; by adding:
; Environment=DVSWITCH=/etc/MMDVM_Bridge/DVSwitch.ini
; to /lib/systemd/system/mmdvm_bridge.service

; Configure the Quantar Repeater Partner
; Note that the TX and RX ports are already reversed for MMDVM_Bridge <--> Quantar_Bridge
[QUANTAR]
address = 0.0.0.0               ; Address to send IMBE TLV frames to (export)
txPort = 34103                  ; Port to send IMBE TLV frames to (export)
rxPort = 34100                  ; Port to listen for IMBE TLV frames on (import)
quantarPort = 1994              ; HDLC frames To/From the Quantar repeater
debug = 0                       ; Debug 0 = off, 1 = on (adds lots of additional messages)
logLevel = 2                    ; Logging levels, 0=No logging, 1=Debug, 2=Message, 3=Info, 4=Warning, 5=Error, 6=Fatal
logFilePath = /var/log/dvswitch/Quantar_Bridge.log

; Configure the DMR Partner
; Audio format is AMBE 72 bit
[DMR]
address = 127.0.0.1             ; Address to send AMBE TLV frames to (export)
txPort = 31100                  ; Port to send AMBE TLV frames to (export)
rxPort = 31103                  ; Port to listen on (import)
slot = 2                        ; Export slot
exportTG = Ваша разговорная группа на DMR сервере                ; Which TG to export
hangTimerInFrames = 0        ; Use 50 for 3 seconds of hang time (3000 / 60)
; talkerAlias = %callsign %location %description ; Get callsign location and description from MMDVM_Bridge.ini
talkerAlias = Analog <> DMR Bridge

; Configure the D-Star Partner
; Audio format is AMBE 48 bit (DSAMBE)
[DSTAR]
address = 127.0.0.1             ; Address to send AMBE TLV frames to (export)
txPort = 32100                  ; Port to send AMBE TLV frames to (export)
rxPort = 32103                  ; Port to listen on (import)
fallbackID = 1234567            ; In case we can not find a valid DMR id in the database, export this one
exportTG = 9                    ; Which TG to export
slot = 2                        ; Export slot
RemotePort = 54321        ; Port to send Gateway commands to
message = %location %description ; Get location and description from MMDVM_Bridge.ini

; Configure the NXDN Partner
; Audio format is AMBE 72 bit
[NXDN]
address = 127.0.0.1             ; Address to send AMBE TLV frames to (export)
txPort = 33100                  ; Port to send AMBE TLV frames to (export)
rxPort = 33103                  ; Port to listen on (import)
fallbackID = 1234567            ; In case we can not find a valid DMR id in the database, export this one
nxdnFallbackID  = 12345         ; Use this ID when the input DMR ID is not found in the database
translate = 1234=4321           ; Translate NXDN TG < -- > DMR TG (bidirectional)
slot = 2                        ; Export slot
RemotePort = 6075        ; Port to send Gateway commands to

; Configure the P25 Partner
; Audio format is IMBE 88 bit
[P25]
address = 127.0.0.1             ; Address to send AMBE TLV frames to (export)
txPort = 34100                  ; Port to send AMBE TLV frames to (export)
rxPort = 34103                  ; Port to listen on (import)
slot = 2                        ; Export slot
RemotePort = 6074        ; Port to send Gateway commands to

; Configure the Yaesu Fusion Partner
; Audio format is AMBE 72 bit
; Audio format is IMBE 88 bit
[YSF]
address = 127.0.0.1             ; Address to send AMBE TLV frames to (export)
txPort = 35100                  ; Port to send AMBE TLV frames to (export)
rxPort = 35103                  ; Port to listen on (import)
txWidePort = 35105        ; Port to send IMBE TLV frames to for YSFw (export)
fallbackID = 1234567            ; In case we can not find a valid DMR id in the database, export this one
exportTG = 9                    ; Which TG to export
slot = 2                        ; Export slot
RemotePort = 6073        ; Port to send Gateway commands to

; Configure the BrandMeister connection
; Simple Terminal Feature Update
; Audio format is AMBE 72 bit
[STFU]                          ; Brandmeister Open DMR Terminal (ODMRT) Protocol
BMAddress = 3102.repeater.net   ; Brandmeister ODMRT server address
BMPort = 54006                  ; Brandmeister ODMRT port
BMPassword = passw0rd           ; Your Brandmeister password
Address = 127.0.0.1             ; Address to send AMBE TLV frames to (export)
txPort  = 36100                 ; Port to send AMBE TLV frames to (export)
rxPort  = 36103                 ; Port to listen on (import)
UserID  = 1234567               ; Your DMR ID
TalkerAlias = N0CALL Name City  ; Max 27 characters
StartTG = 3166                  ; Startup talk group
LogLevel = 3                    ; STFU log level (0=No logging, 1=Debug, 2=Message, 3=Info, 4=Warning, 5=Error)

[ASL]
address = 127.0.0.1
txPort = 30100
rxPort = 30103
nano /opt/MMDVM_Bridge/MMDVM_Bridge.ini
[General]
Callsign=Ваш позывной
Id=ваш DMR ID плюс ве цыфры (2550xxxxx)
Timeout=180
Duplex=0

[Info]
RXFrequency=0
TXFrequency=0
Power=0
Latitude=46.4412
Longitude=30.8546
Height=0
Location=Какой-то Gateway - так будет отображатся название в дашборде.
Description=MMDVM_Bridge
URL=https://groups.io/g/DVSwitch

[Log]
# Logging levels, 0=No logging, 1=Debug, 2=Message, 3=Info, 4=Warning, 5=Error, 6=Fatal
DisplayLevel=1
FileLevel=2
FilePath=/var/log/mmdvm
FileRoot=MMDVM_Bridge

[DMR Id Lookup]
File=/var/lib/mmdvm/DMRIds.dat
Time=24

[NXDN Id Lookup]
File=/var/lib/mmdvm/NXDN.csv
Time=24

[Modem]
Port=/dev/null
RSSIMappingFile=/dev/null
Trace=0
Debug=0

[D-Star]
Enable=0
Module=B

[DMR]
Enable=1
ColorCode=1
EmbeddedLCOnly=1
DumpTAData=0

[System Fusion]
Enable=0

[P25]
Enable=0
NAC=293

[NXDN]
Enable=0
RAN=1
Id=12345

[D-Star Network]
Enable=0
GatewayAddress=127.0.0.1
GatewayPort=20010
LocalPort=20011
Debug=0

[DMR Network]
Enable=1
Address=2551.adn.systems
Port=62031
Jitter=360
Local=62032
Password=passw0rd

# for DMR+ see https://github.com/DVSwitch/MMDVM_Bridge/blob/master/DOC/DMRplus_startup_options.md
# for XLX the syntax is: Options=XLX:4009

Options="TS2=255xx;"
# Ваша разговорная группа на DMR сервере. Тут мы задаем статику для нашего шлюза.

Slot1=0
Slot2=1
Debug=0

[System Fusion Network]
Enable=0
LocalAddress=0
LocalPort=3200
GatewayAddress=127.0.0.1
GatewayPort=4200
Debug=0

[P25 Network]
Enable=0
GatewayAddress=127.0.0.1
GatewayPort=42020
LocalPort=32010
Debug=0

[NXDN Network]
Enable=0
#LocalAddress=127.0.0.1
Debug=0
LocalPort=14021
GatewayAddress=127.0.0.1
GatewayPort=14020
На этом всё, перезагружаем сервер и проверяем на работоспособность наш мост. Должно появиться ваше подключения на вашем SVX рефлекторе, а также на Украинском ADN DMR сервере
Также по адресу: http://ip вашего сервера появится DashBoard вашего DVSwitch. Возможно он у вас будет не корректно отображаться. Скорее всего это из-за того что на вашем сервере установлен PHP 8.x а ему нужен php не выше 7.4. Проверить версию вашего PHP можно в консоли, командой php -v (это поправимо).
Остались вопросы?, пишите их в комментариях.

 Как я строил домашнюю электростанцию в Одессе и перестал бояться отключений
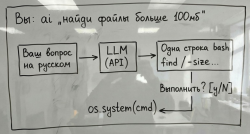 Я заменил Google на 50 строк Python. Через месяц я забыл, как пишется tar -xzf